Monday 25 February 2019

Weekly Post for the Happy Craft Challenge blog / Cards

Hi Guys

Its my turn on the https://thehappycraftchallenge.blogspot.com.

This last week I  was still catching up on the Birthday Cards for a couple of customers

I am sharing the cards that i created for an 8 year old girl , i have not  glued down the 8  as once the customers has chosen i can  remove the 8 and the cards  can go into my stash for someone else

I have no idea what eight year old's  girls like so have made a couple so  the buyer has some choice

I have two Fairy cards , A Mermaid  z fold card and one with eight Balloons.


A few weeks ago i was in a $2.00 shop and came across a Fairy  Designer paper pack from Pass time Craft. The Designer pack had 8 sheets and two of the same design in all the colours of the rainbow. I also had purchased ages ago or may be it was a challenge win not sure a yellow decoupage Fairy sheet which i have used

The First Fairy  Card is a 5.5" square card
I have cut the bottom right hand side of the yellow paper  to create the base, out of the second sheet i fussy cut another butterfly and fairy to layer onto the card
Dye cut the Happy Birthday out of scraps of yellow and use a flower from my stash . Added Gems
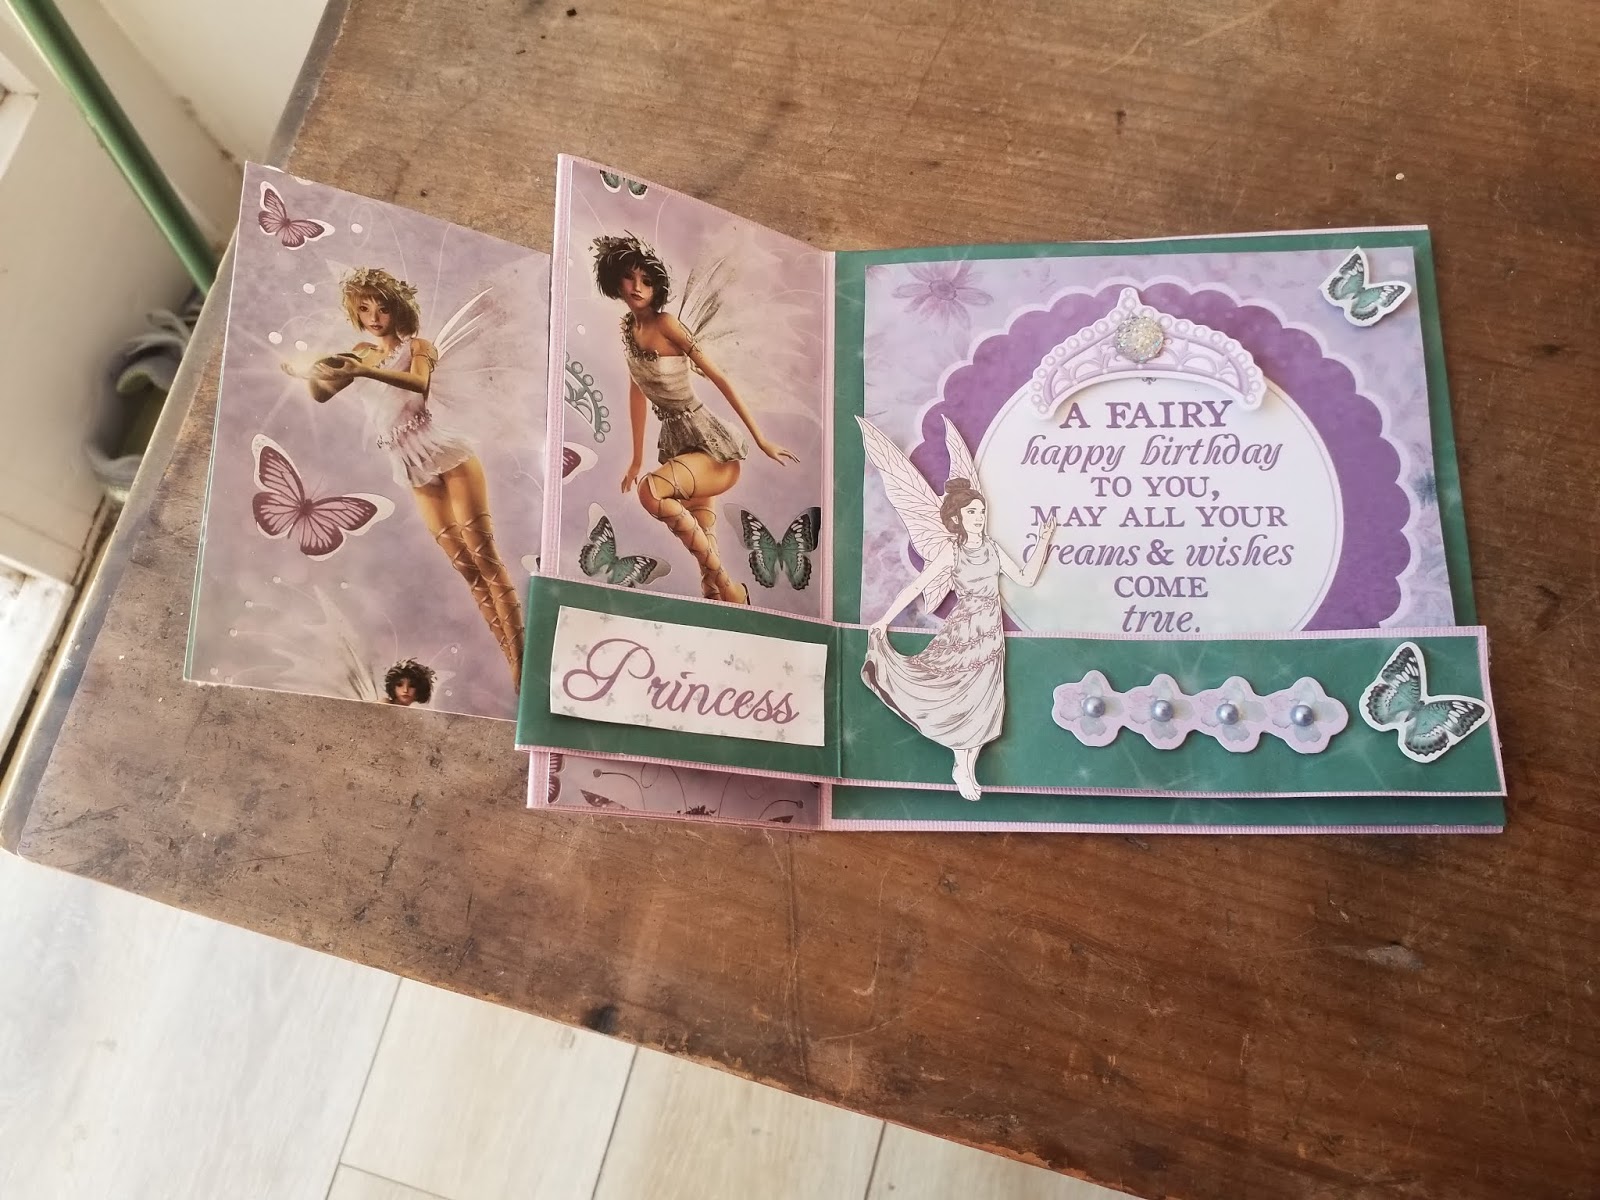


Second Fairy Card

I used a piece of green from the designer pack as my base  6" x 4" card base using it as a tent fold card. Fussy cut more butterflies from the yellow designer paper.  Dye cut another  "Happy Birthday" from scraps of yellow designer paper
Layered all the levels of the fairy to make a decoupage " little yellow fairy" Added to card
Added Gems and the fussy cut butterflies


This is my favourite card


The Third Card is a Z fold Mermaid card  at 4.75" square

I have used Kaisercraft "Mermaid Tales"and Kaisercraft purple card stock. all the pieces were scraps left in my bag. If i was starting from scratch the papers would have been "Ripples"  Reverse and "Deep Sea" Reverse with Collectables and Gems


The Fourth Card Is a  Balloon Card


I have used scraps from my box  in tones of pink, blue and purple
I have dye cut the balloon in the four colours and layered to the base colour of pink
Added  Butterflies
Dye cut circle and flower for placement of the number 8
Add Gems  in top let hand corner
Dye Cut the Words "Have a Wonderful Birthday from scraps of mauve card stock


Saturday 23 February 2019

Our Special Day (Maureen Wood) Aust

Good Morning

On this windy day in South East Queensland, still getting the winds from cyclone "OMA" which is sitting off the coast, not expect to cross the coast but whipping up some wild  seas and windy weather, but alas no rain which we need desperately,

I decided to do the double page layout sketch for "Stick it Down" had a few photo from my granddaughter dinner after her graduation  from primary school (where she was presented with her Lei ) It has become a bit of tradition from a friend of mine who started making them for my grandchildren several years ago for graduating from school

The LEI is a symbol of Love and congratulation for Graduating it also symbolism Wishes of Good Luck.


THE SKETCH


MY INTERPRETATION:


PRODUCT:


Kaisercraft Card stock:- Cookie x 2

Kaisercraft  "Scrap Studio" Collection:- Gritty
Kaisercraft " Memory Lane" Collection :- Misty Rose, Morning Frost, Tranquillity,
2 x Mint Blush Reverse and Villawood Reverse. Sticker sheet and Collectables.  White Pearls and Mint green Rhinestones Wooden flourish
Butterfly dye  from my stash 
Uniquely Creative Hibiscus outline dye
Kaisercraft lacy tag dye
3" narrow mint green ribbon from my stash


CUTTING:

Cut "Gritty"  2 x 6.5" x 4.25" Photo mats
Cut "Gritty" 3 x 3.25 x 3.25" Photo Mats
Dye Cut  using "Gritty" one lacy tag , then cut to 2" x 3"
Cut "Mint Blush" Reverse 10" x 10"  and  12" x 10"
 Fussy Cut flowers from  "Tranquillity" then cut   11" x 8" 
Cut "Morning Frost" 12" x 4"
Dye Cut Hibiscus  x 4 from "Mint Wishes" Reverse
Dye Cut 4 x Butterflies from scraps
Fussy Cut flowers from "Misty Rose"

ASSEMBLY:

Using "Cookie" card stock as your base  both pages (I have actually put these together as two separate pages but aligned the " Mint Blush" to match the first page
Starting with the

Second Page

Added  2 x 6" x 4" photo to mats
Add 12" x 10"  "Mint Blush" 1" from the top and a 1" gap at bottom to the "Cookie" card stock
Add  "Tranquillity" 11" x 8" to the "Mint Blush"
Add photo mats 2.50" from the top and 0.25" from the left
add second photo mat 2.5" from the top and 0.50" from first photo
Add  ribbon to tag
Add journal to tag
Add tag 2.5" from the top and 0.75" from right hand side
Add  Flower cluster to bottom right of photo using fussy cut flowers , collectables and wooden flourish. (See photo for further detail) 
Add butterflies as per photo ass rhinestones

FIRST PAGE :

Add  "Mint Blush" Reverse 10" x 10" to " Cookie"  Card stock
Add "Morning Frost" 12" x 4" to  "Mint Blush" Reverse at far right of page
Add the 3 photo mats starting 2" from the top and 0.25" from the right , leaving a small gap between each as per photo
Using the fussy cut flowers from the "Tranquillity"  create and Arch  as per photo using fussy cut flowers dye cut hibiscus and pieces from the sticker sheet see photo for details
Add pearls and rhinestones as per photo
Add Title 


Monday 18 February 2019

Mid Monthly Challenge "Circles"


  1. No photo description available.
Morning all

Was asked to do another Design Team post for our Mid Monthly Challenge over on the  Happy Craft Creations  Face Book Page . Members only challenge
Come join the fun, You could make a card , a layout , ATC Coin , or even a knitted or crochet circles, It is not limited to paper craft

The challenge is 'CIRCLES'


I had a request to make a couple of Birthday Cards which i thought i would incorporate into the challenge for this post, One was very specific it  had to be green.
I saw the dimensions for the fold i m using in the February kit for "Uniquely Creative" monthly kit magazine. I make step cards normally but this just add a little bit extra to the mix Both cards end measurement is 5.50" square

I hope you like them

They use two pieces of card stock,  ( Fern and Toffee) which i matched so they could be used on both cards so it did not go into my card pieces box

The Green one is  made using Kaisercraft "Memory Lane" :- Frost,Tranquility (Reverse) Misty Rose (fussy cut flowers) and Mist Rose  (Reverse)    Pearls and Sticker Sheet  
Kaisercraft  Stitched Circle Dyes


The second card: i Used Kaisercraft Wildflower collection:- Flowering, Succulents (Reverse) Wooden flourish, Collectables and sticker Sheet,     Kaisercraft  Stitched Circle Dyes


Mystical Scrapbooks Cyber Crop Week end (Entries)

Morning All


Another weekend has passed us by, Much cooler weekend  overcast today although the weeks is expected to be in the high 30's.Cyber crop weekend for Mystical Scrapbooks
Colour Palette,  Tic Tac Toe and a sketch challenge.

https://mysticalscrapbooks.blogspot.com


Mystical Scrapbooks
I chose  Basically all the colours , Used Kaisercraft "Rose Avenue" :- Wooden Panels Reverse, as base Irreplaceable, Courtyard, Suite, and Patio
I stenciled using Kaisercraft "Weave stencil  with Modeling paste and black paint. (I love the grey effect it produced)

MY INTERPRETATION:


The second one i did was the sketch , I moved away from the Pinks as this month its been all about love and Valentine day


In this One I have used Kaisercraft "Lets Go" :- Fly away Reverse, Road Map, Sight seeing  and  Kaisercraft "Just Landed" :- World map.  the dyes where in a Bundle  pack from Kaisercraft. Red card stock to add some colour

Mystical Scrapbooks


MY INTERPRETATION:


The Final one was the  Tic Tac Toe  Challenge. I did struggle with this one as very Valentine themed.


I ended up going Nuvo drops, Patterned Paper and Die Cut Hearts
I used the last of my "Cottage Rose" collection and the Nuvo drops tended to be a bit tricky to get the size i wanted


Mystical Scrapbooks


MY INTERPRETATION:


 Just going to add the last page i did for the monthly challenge, which was to use Heart, Sequins or Confetti  and Paint or Misting.


This challenge contained to elements in it which i dislike Sequins or Confetti  and Paint or Misting.
I chose to use Sequins and Confetti  and Paint or Misting.  Sequins and Confetti way to tiny for me to see  and well Paint or Misting. Paint, i hate and the misting i took it outside to do and got it all over a white outdoor chair as it was so windy, lucky its water based so came off easily. I use Kaisercraft "Rose Avenue "


MY INTERPRETATION:


Sunday 10 February 2019

Lazy Summer days

Hello all

Another warm one today. I thought this morning, I would do the  ARTastic Challenge.

The challenge is be inspired my the below picture. I love the blue/ greens with the hint of pink and purple.When i first saw this picture it reminded me of either Fairies or Mermaids with the purple hue against the blue / greens with a hint of brown


Searching through my stash , I came across a layout near completion , but no picture , Don't know why the papers are from early 2016. The pack may have been given to me , but i thought it matched the colour scheme well so decided i would finish it , did not need to do much as the photo mat had already been created, all as it need where the photo and some embellishments. Finished
I have added instructions as to what it would appear i have completed


MY INTERPRETATION:


PRODUCTS USED:


Kaisercraft "Mermaid Tales":-  Marine, Aquarium Reverse, Sea Foam, Deep Sea , Deep Sea Reverse  and Collectables
Kaisercraft Card Stock  :- Orchid, Periwinkle
Imaginarium Chipboard words
Kaisercraft inks in Orchid and Avocado 
Flowers from my stash


CUTTING:

Cut "Marine" 11.50" x 11.50"
Cut 8" Circle out of the middle of the "Periwinkle" card stock
Cut 9.5"x 9.50" from "Orchid" card stock
Cut 9" square from "Sea Foam"
Cut 7.5" circle from  "Aquarium" Reverse
Cut 6.25" x 4.25" from Aquarium" Photo mat
Cut 6.50" x 4.50" from "Sea Foam" Photo Mat
Cover the chipboard pieces using "Orchid" and "Avocado" Inks
Fussy cut Mermaid and Coral from  "Deep Sea" and "Deep Sea" reverse


ASSEMBLY:

Add "Marine"  to "Periwinkle" card stock leaving 0.25" boarder
Add " Sea Foam" to Orchid" card stock
Add " 7.5 " circle "Aquarium" Reverse to 8" "Periwinkle" card stock
Add the "Orchid square at and angle to " Marine" with bottom left corner 2.5" from the left
Add the "Periwinkle"circle 2.5" from the top (middle of 9.5" square") see photo for guidance
Add " Aquarium" Photo mat to  "Sea Foam" Photo Mat, add photo to the Mats 
Add to page  at an angle 2" from left hand side and 4" from the top
Using photo for guidance create cluster at bottom left of your photo. with flower cluster top right of square
Add chipboard words see photo for placement.
Add salvage from" Marine" to bottom of square.

Valentine's card Handmade with Love (Maureen)

Hi Guys,

Just sharing a card i made for Valentine day,  A Z fold card, love these quick and easy
I have actually sent it off for to a  card swap partner
I just thought i enter in into some card challenges as well
Its made using  Kaisercraft Treasure Memories paper  with lots of fussy cutting of flowers, wooden hearts , stitched circle dyes  and A Mothers Art Butterflies


I hope you Like the card


Am entering  the card into these challenges:

http://letscreatechallenges.blogspot.com
https://lovetocraftchallengeblog.blogspot.com/

Life's a book we fill the pages

Morning all

I finished this one off  yesterday, when the house was quite, the only one at home
The layout is for a Challenge over on the Let's Get Sketchy  blog


The sketch was fun, finding a large photo was much harder, I ended up using an old school photo of my granddaughter :


THE SKETCH: 


MY INTERPRETATION:


PRODUCTS  USED:

Kaisercraft "Take Note" Collection:- Novel, Pages, Pages Reverse, Library Card, Book Plates, Read, Books and  Sticker sheet
Uniquely Creative Stitched Heart Outline dye
Scraps of brown , yellow and lime green card stock
Ric  Rack Braid in light blue
6" x 6" photo


CUTTING: 

Cut " Pages" 6 x 12"
Cut "Pages" Reverse 2" x 12"
Cut "Library Card" 6" x 12" vertically
Cut 2" x 5" "Book Plates" reverse and make into a fish tail
Cut 2" x 5" "Read" reverse and make into a fish tail
Cut "Library card" 4.5" x 4.5"
Cut " Books" 6.25" x 6.25" (photo mat)
Cut "Books" 4.5" x 4.5"
Cut Brown Card Stock 4.75" x 4.75"

ASSEMBLY:


Add "Library Card" to left hand side of "Novel"
Add "Pages to the Bottom of "Novel"
Add "Pages" Reverse 7.50" from the top and horizontally across the page
Add the two fish tails overlapping starting 0.50" from the top and hard against left hand side
Add photo to mat add to page  3.75' from the top and 5.25" from the leftusing foam tape
Construct the little book, using brown card stock as your base score at 2.25" from the left and 2.25" from the right vertical to form a spine
Score "Books" in half
Score  "Library card" in half
Add Books" to base of brown card stock using foam top and 0.25" in from each end to form a hump to look like a book,   then add "Library Card". Ensure journal is written prior to adding.
Add a piece of braid to middle of book
Add to page 4.50" from the top and 0.25" from left hand side
Add embellishments and title from the sticker sheet 
Add the two dye cut hearts as per photo


Saturday 9 February 2019

Chase the endless Summer (Maureen Wood) Aust

Afternoon all on another warm day is south east Queensland

The challenge layout today is for  


The challenge is to Use Ombre, the meaning is: 

 The gradual blending of one colour hue to another, usually moving tints and shades from light to dark.


 I have use  a Kaisercraft Specialty sheet with some light to dark Kasazz Alcohol Markers to try to obtain the effect and each of my clusters i have move from a light to dark  or dark to light


MY INTERPRETATION:


PRODUCTS:


Kaisercraft "Summer Splash " Specialty sheer "Sun Kissed"
Kaszazz Alcohol Markers :- Powder, Sky,Ocean and Marine
Kaisercraft Deep Sea Collection :- Tide, Snorkel, Dive and Dive Reverse, Collectables and Sticker Sheet.
Close to my Heart Punch Label Punch
6" x 4" portrait photo

CUTTING:

Fussy cut the shells from  "Tide"  
Fussy cut the turtles from "Snorkel"
Cut "Dive" 5.5" x 12"
Cut "Dive" Reverse 6.25" x 4.25: (Photo Mat)
Punch Label from "Dive" Reverse


ASSEMBLY:

Using the Specialty Sheet as my Base graduated the colours in the Alcohol Markers down the lettering starting with Powder, Sky,Ocean and Marine
Added "Dive"3.5" from the top running horizontally across the page
Add row salvage from sticker sheet 9" from the top ( see photo)
Add photo to "dive" reverse and add to page using foam dots 3" from the top and 3.75" from the left hand side
See photo for clusters of embellishments to left and write of photo


+


Friday 8 February 2019

Love (Mauree Wood) Aust

Afternoon All.

On this overcast and muggy Friday afternoon..

I went to post my "WHITE WITH ONE " challenge page and realized they wanted a sketch. I had completed one with a sketch but not the right sketch. Ian  beginning to realise should not ask Hubby assistance to down loaded the sketch as he wrote the wrong challenge on the pages, hence i had to do another layout for White with one plus red
Are well it got 3 Photos scraped so should be happy with myself. My second page i have posted at the bottom of the blog

The Challenge site is:


The Colour was Vivid Red and the Sketch is below:


MY INTERPRETATION:


PRODUCTS USED:


Kaisercraft White and red card stock
Kaisercraft 12" x 12" "Love" stencil
Kaisercraft " Mix and Match" Sticker sheet for date
5" of Lace flowers plus three large white lace flowers and white flower  from my stash
Chip Board Pieces and Wooden word (from my Stash
Gems from Stash
Friskars  Heart Boarder Punch
Versa Mark Ink "Cardinal"
Bella Red Fusion "Doily"
Bella Red Fusion reverse " Red Stripe"
Close to my Heart "Label Punch"
O'Sullivan "Heart Punch"
6" x 4" Photo


CUTTING AND STENCIL WORK:


Cut " Doily" 2.25" x 7"
Cut " Red stripe 2" x 1.75"
Cut Photo mat 6.25" x 4.25" from white card stock
Cut  red card stock 5"x 4", boarder punch top and bottom
Cut white card stock 4.50" x 4" , boarder punch top and bottom
Stencil the Love hearts using "Cardinal" ink on white card stock  Cut to 4" x 5.25"
Stencil flowers for 2" using "Cardinal" ink  on white card stock  Cut to 2" x 3"
Cut 3 hearts from red card stock
Cover the hearts and the wording in "Cardinal" ink 
Dye cut label from red card stock


ASSEMBLY:

Add the stencil red  hearts 1.75" from the top and 2" from the left hand side 
Tuck the dye cut  label underneath the top of the hearts 4" from the left hand side
Add photo to white photo mat 
Add photo mat to page 1.5" from the left and 3.75" from the top using foam tape
Add stencil flowers 9.25" from the top and hard up against left hand side
Add "Doily 2.5" from left hand side and 1" from the bottom(tuck in under photo)
Add piece of "Red Stripe"0.25" from bottom and 3.25" from left hand side tucking it under "Doily"
Add the punched red card stock 5" from the top and  5.75" from the left hand side.(tuck under Photo Mat)
Add the punched white card stock centre in the middle of the red card stock (see photo)
Add embellishments as per photo


Book Week

Morning all 

Just wanted to share a layout i have completed for Kraft +  challenge 


 This month we want you to scrap about books and all things reading. It was hard to make a decision as to what to use for this challenge

I have chosen my granddaughter at Book week in her last year a primary school. Sophie had chosen to go as  "Alex" from Mind craft


Today I decided to share a few more photos as the main photo does not do the page justice. I decide i wanted this page as a book, which in my mind it does not show

MY INTERPRETATION:


SIDE VIEW WHICH SHOWS THE JOURNAL


BOTTOM VIEW:


I have  used

Kraft card stock as my Base
Kaiser craft "Story Book" Collection:-  Books, Pages Book Plate, Borrowed  and Sticker Sheet 
Kaisercraft "Scrap Studio" :- Coarse
Yellow Card stock
Kaisercraft 6" x 6" word stamp
Brilliance Cinnamon ink
Flowers from my stash as Book Mark
Owl Butterfly as my Book Mark to hide the journal
Silver Mirror Board
Unknown dye for corners


Tuesday 5 February 2019

Perfect

Hello All


Just starting on this post this evening, as my card came together so quickly this morning, I thought i give another sketch challenge ago. This time it was  Mystical Scrapbooks


Decide to complete their sketch challenge first, as they usually have two  challenges and a cyber crop per month

THE SKETCH:

Mystical Scrapbooks


MY INTERPRETATION:


PRODUCTS:

Kaisercraft Cottage Rose Collection :- Crochet Reverse
Kaisercraft "Mademoiselle":- Floral Spray, Floral Spray Reverse, Mannequin, Threadwork Reverse, Mahogany , Collectables and Sticker Sheet.
Musk card stock,
Imagine Craft "Gold" Shimmer Spritz
 Kaisercraft Red Paint
Flower and Butterfly from my stash
Kaisercraft Doily Dye
6" x 4"

CUTTING:


Cut "Floral Spray" Reverse  7.25  5.25"
Cut "Mannequin" 6.5" x 4.5"
Cut "Mannequin" 3.25" x 12"
Cut "Mahogany" 4" x 2.25"
Cut the Black Lace from "Thread work" Reverse  1.25" x 5.50"
Fussy cut Red Rose from "Floral Spray"
Cut Wording from salvage of  "Floral Spray"
Dye cut doily from "Mannequin"
Dye Cut "Hearts" from Musk Card stock and "Mannequin"


ASSEMBLY:


Use "Crochet" Reverse as base
Add "Mannequin"  to "Crochet" at the bottom of page
Add row of butterflies from sticker sheet
Add "Mannequin" to  "Floral Spray"
Add photo to "Mannequin"
Add to "Crochet"2.25" from the top and 2.50" from the left using foam tape
Add "Mahogany" 4" x 2.25 " i" from the left and 1.50" from the top , tucking into photo mat
Tuck collectable over the top 0.75" from the top and 2.25" from the left
Tuck row of pink lace 1.25" from the left, add row of black lace through the middle see photo for further details
Add collectables and hearts as per photo
Splatter lightly red paint
Mist with "Gold" Shimmer Spritz


Monday 4 February 2019

Card Sketch (Maureen Wood( Aust)

Hi Guys

Much cooler day, mostly sun showers this morning, rather heavy ones too, Glad of the rain.I thought i get this card made whilst on a roll from yesterdayThe card Sketch is for "STICK IT DOWN"  Hope you like it.


February Card Sketch


MY INTERPRETATION:


PRODUCTS USED:


Kaisercraft Tea Break Collection:-  Sugar Cookie, and Sticker Sheet, Pink glitter card stock
Kaiser craft  White Card Base 5.25" x 5.25" and Dusty Pink paint
Mirror Board
Scrap Matts Butterflies
Paper Rose Rectangle stitched Dye
Catchy Crafts Happy Birthday Dye
Tsukineo Brilliance Pearlcent Ink :- "Orchid''

CUTTING:

Cut "Sugar Cookie" 5.20" x 5.20"
Dye cut Pink Glitter card stock with rectangle Dye 3.5" x 1.50"
Dye Cut  "Happy Birthday" from gold Mirror Board
Cut the flower boarder stick to fit diagonal on "Sugar Cookie"


ASSEMBLY:

Colour butterflies with  "Orchid'' ink
Add "Sugar Cookie" to card base
Add floral boarder sticker diagonal across "Sugar Cookie"
Add the  Dye cut Rectangle 2" from top and 1" from the left with foam tape
Add the inked Butterflies as per photo
Add the "Happy Birthday" dye cut to Pink glitter  rectangle
Ink splatter with Dusty Pink Paint
Add small pink flower from sticker sheet to the dye cut glitter card stock


Sunday 3 February 2019

Friend ship cards

Hi Guys

Another set of  two cards just finished today

I have used Kaisercraft "OOh La La" Collection a very old collection 2016 which i wanted to use for a while


 I  Have actually used all of it so no left overs. I made three friendship cards and a Birthday Card.  When i had finished I only had a 7" heart  I cut previously, and a full sheet left with a few collectable so completed a Layout.

A bit of space in the drawers now.  My  New Year resolution was to ensure i used one bag of goodies pre 2016 in entirely once a month. First month Down

I am entering the below challenges

A Centre Step Card:


Z FOLD CARD 


 1)       https://lovetocraftchallengeblog.blogspot.com

2)         http://craftyhazelnutspatternedpaper.blogspot.com

3)       http://creativecrafterschallenge.blogspot.com

4)        https://thehappycraftchallenge.blogspot.com

5)          http://2sistersontheblog.blogspot.com

Fairy Card

Hello all

Everyone is telling me i should enter my cards into challenges
So i thought i give it a ago this year,  need to make some cards for my stash  as was getting very low after Christmas and then i was on holidays thru January,  and need some  Birthday cards for up coming  month

So here is my Fairy Birthday card it is a Z fold card  Hope you like it
I will be entering it into the below challenges

It has been completed using Kaisercraft "Fairy Garden" collection and the collectables
Wooden Number 3 Inked in  "Brilliance Lavender" and top off with silver glitter


THE INSIDE OF THE Z FOLD CARD:


 1)       https://lovetocraftchallengeblog.blogspot.com

2)         http://craftyhazelnutspatternedpaper.blogspot.com

3)       http://creativecrafterschallenge.blogspot.com

4)        https://letscreatechallenges.blogspot.com

5)          http://2sistersontheblog.blogspot.com

You are the Reason I smile every day (Maureen Wood) AUST

Afternoon all

On this Sunday afternoon when it can not make its mind up, where the sun is coming out or it wants to rain, nice breeze though.

Yesterday i was making  cards for my box as it is running very low, I wanted to use up a  some sayings i have had cut out for ever, (the paper is from 2016.) and ended up with a layout instead.

In the bag there was a full sheet of paper, lots of little cut pieces and a heart, must of cut it for some reason and not used it. After making up cards, i was left with the full sheet , a heart and some fussy cut pieces, I knew i seen a  challenge sketch with a heart on it, so went looking , found it. Decided i had enough bits to do the sketch and my page was born. Hope you like it   and no i do not have any pieces left used it all in my layers on my layout. I have written the instruction as if i was starting from Scratch as any colours could be used.


THE SKETCH:


February Single Page Sketch


MY INTERPRETATION:


PRODUCTS USED:

Kaisercraft "Ooh La La" Collection:- Oui Oui, C'est La Vie, Bonjour, Belle, Au Revoir,  Merci  and Collectables 
" Paper Doyleys" of doilies, circular and heart shaped
Pearls, cream satin  hearts and flower gems from my stash
Scan n Cut : 
6" x 4" photo and 3" x 2"  photo


CUTTING:

Used Scan n Cut to cut 7" heart from "Oui Oui"
Fussy cut flowers , birds and clock from "C'est La Vie"
Cut 6.25" x 4.25" and 3.25" x 2.25" from  "Bonjour" (Photo Mats)
Cut strip of wording from "Au Revoir" cut to 10" then cut  wording strip in half
Cut 1.25' x 10' from "Belle" to mat wording

ASSEMBLY:

Using "Merci" as base add heart 1" from the top and 1" from the left hand side
Add photo to mats using foam tape
Add the string of pearls around the right side of heart
Create a cluster and of flowers, clocks, butterflies and birds from your fussy cut pieces add to your 4" circular doily see photo
Add the circular doily in the top left of your heart
Add the 6" x 4" photo mat 4.5"  from the top and 0.25" from the left
Add the heart doily 6.50" from the top and 2" from the right hand side 
Add small photo mat to centre of doily
Add the wording strip to "Belle" add to page as per photo
Add the remainder of embellishments see photo for placement