Showing posts with label Mystical scrapbooks blog. Show all posts

Sunday, 8 May 2022

cOOKIE

 Morning  all

Its raining, quite heavily at times.  We have had heavy rain overnight,. Thought I would get this done first as if I leave it , it will get forgotten, just like several last month.

I have a busy day two Specialist appointments  quite a distance apart, hate driving in the rain. 

This one us for Mystical Scrapbooking face book group

https://mysticalscrapbooks.com.au/

 The theme for the next two months is Retro TV Shows

The first one is  "Bewitched  " requirements are: 1 : Use Halloween Colours, 2  : Use either a Cat, Witch,  or Broom, 3: Splatters, 4: Chipboard Stars.

I became very messy with this page. The gold sparkle pen wouldn't work so in the end I squeeze too hard and it came out in to a puddle, them I dropped the modelling paste and made a mess. That's is exactly why I dislike doing mixed 

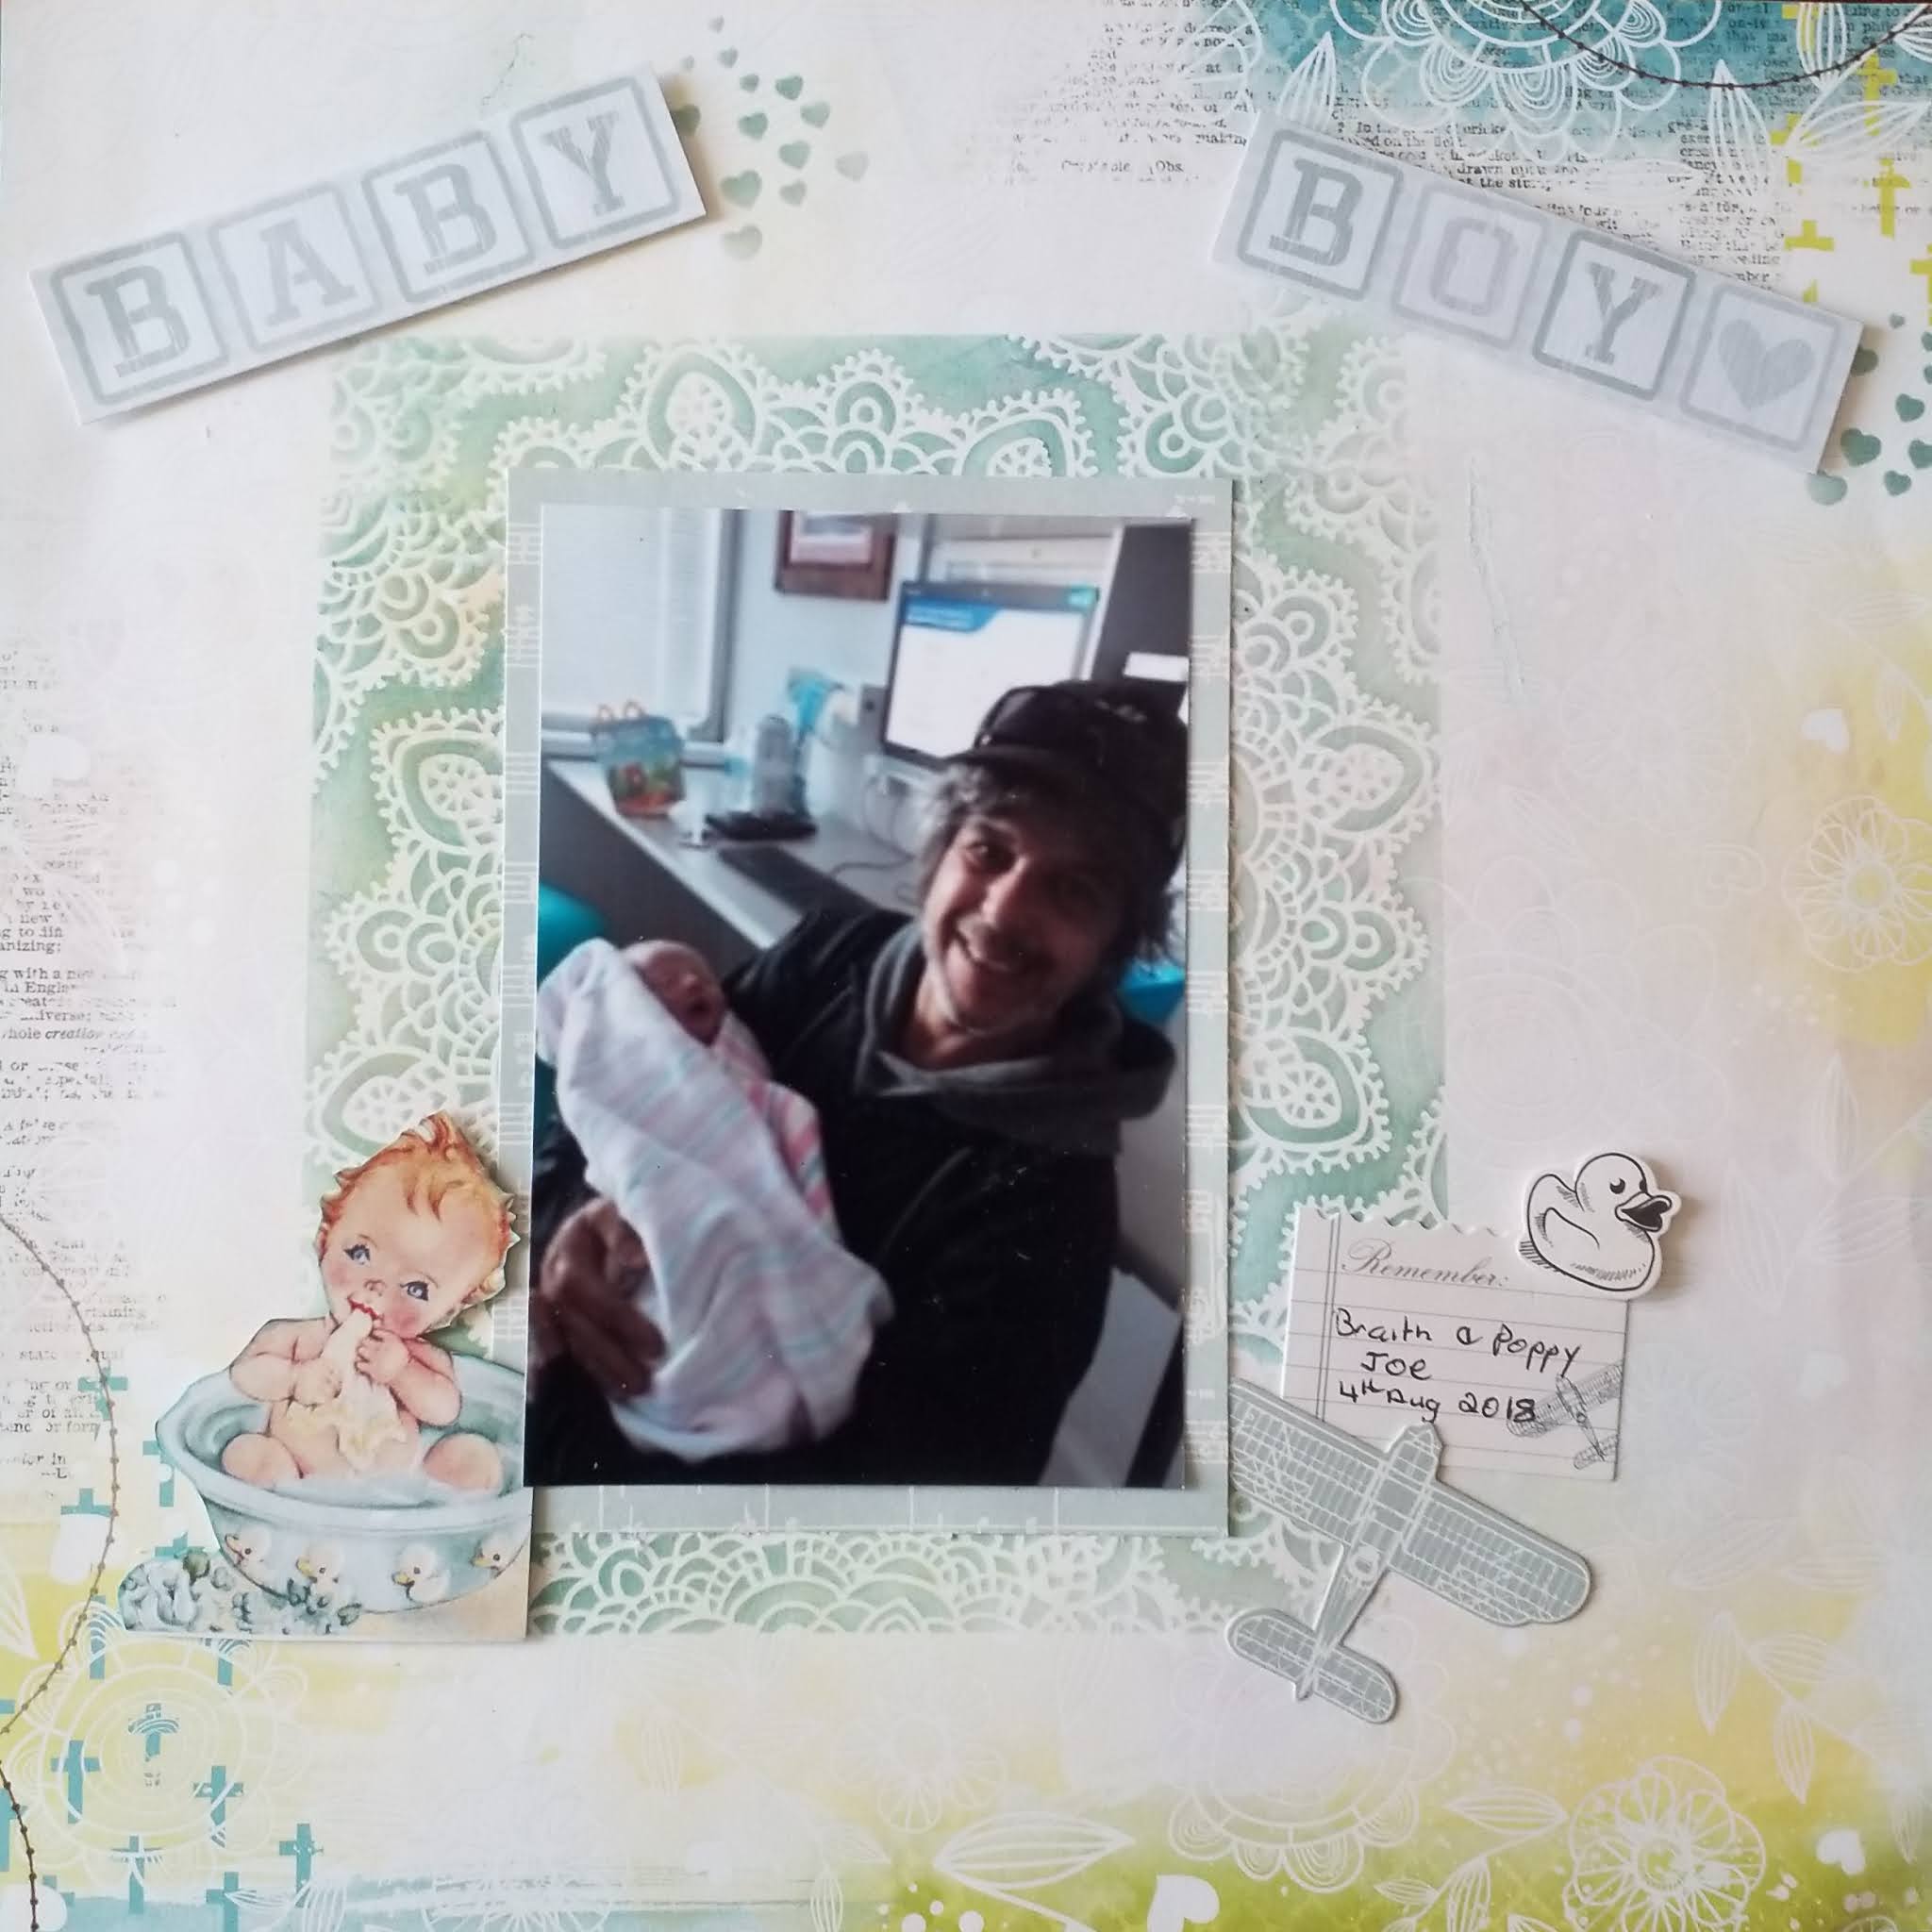
Here is my page. Hope you like  it


MY LAYOUT:


 PRODUCTS USED:

Kaisercraft Coal, Orange and Wine Cardstock 

Modelling Paste 

Stencils unknown brand of Stars, and line stencil.

Kaisercraft Orange Alpha' s and Rhinestones 

Memory Maze chipboard Stars

Orange Onion Bag

Dye cuts cats and witches (received in a swap)

Stamp Bat on grey cardstock (received in a swap)

Nuvo Expanding Mouse: Misted Mauve 

Uniquely Creative Wooden Stars

String unknown Brand

Chopsticks 

Uniquely Creative Sparkle Pens in Black and Gold

2 x 4" x 4.75 " Photos 


CUTTING:

Cut "Coal" Cardstock to 11" x 11"

Cut 2 x  4.50 " x 5.25 " mats from "Wine " Card stock 

Dye cut witches and cats (these also can be stamped and fussy cut out)

Stamp bat on grey card stock and fussy cut out

Cut 30 strands of string  8.50  " for broom and another about about 18"

Cut the Onion bag in 4x covering the stencil 3" x 12" strips on the orange base

STENCIL:

Use the line stencil and Modelling Paste on the outer 4 edges of the "Orange" Card Stock 

Use line stencil and Modelling Paste on the bottom 4" x 12" of the "Wine " Card stock

Use the Star Stencil and Nuvo Expanding Mouse in Misted Mauve on the top of the  "Coal " Cardstock 

Paint 7 chipboard and Wooden Stars with the Nuvo Expanding Paste in Misted Mauve 

Use the Sparkle pens and Splatter across the  "Coal" Cardstock 


ASSEMBLY:


Add the onion bag strips to the outer edges covering the stencil area of the "Orange " Cardstock 

Add  "Coal " Cardstock to the Orange Cardstock leaving a 0.50 " border all the way around

Add Stars, bat and witches i the top of the page

Add photos to mats

Add mats at an angle  first one 4.75 " from the top and 0.50 " from the left

2nd photo mat 3.50  " from the top and 5.50 " from the left hand side overlapping 1st photo a little

Add Broom in between photo mats 

Add title and cats to bottom of page

Add Rhinestones to neck of cat


THANKS FOR STOPPING BY 

HAVE A CRAFTY WEEK 

MAUREEN 


Tuesday, 15 February 2022

"BIG"


Morning all

A gloomy old day, but not cold its has been raining on and off since I got up this morning

Just finished off the Cyber crop from the week end . The crop was all about sketches

with an added twist.. There are three sketches i total so Spamming ere i come today)

This sketch you need to add some Chipboard pieces to the layout. ( i have lots of bits that I have won over the last few years so this was not a problem

https://mysticalscrapbooks.com.au/shop/

I hope you like my take on the sketch

MY LAYOUT:


THE SKETCH:


PRODUCTS USED:

Kaisercraft "Factory 42" Collection:-  Metal Gears

Kaisercraft "Open Road" Collection;- Undiscovered , Stripe paper from the large paper pad only, Collectables, and  Scraps of  paper to cut Tags

Uniquely Creative Tags Dye and  Metal Cogs and tin tools

Ranger Distress Ink :- Tea Dye., Fried Brick, Aged Mahogany

Kaisercraft Twine

Imaginarium designs:- Cogs Chipboard pieces

2 Crafty;-  Cogs Chipboard pieces

3 x 3" square photos

Unknown Brand of White Glitter Alpha's Chipboard

Kaszazz A200 "Crimson" alcohol Marker


CUTTING:

Cut Stripe Paper 4" x 12"

Cut "Metal Gears 9.5" x 9.50"

Dye Cut  6 tags from scraps of "Factory 42"

Add Ranger Distress Ink :- Tea Dye., Fried Brick, Aged Mahogany to Chipboard  pieces blending as you move to centre of each pieces

Colour Alphas  title with "Crimson" Marker

ASSEMBLY:

Use "Undiscovered" as base

Add" Metal Gears 1.75" from the top and 1.50" from left hand side

Add Stripe paper 5.75" from the left and hard against top ( do not stick down  left hand side)

Add some twine to your tags

Add the 6 tags and two from the Collectables tucking each one under the stripe paper ( see photo)

Stick down left hand side of stripe paper

Add the photos 1.50" from the top and 2.50" from the right hand side (leave a 0.25" gap between photos

Add cluster of chipboard cogs to bottom eft of "Cog " paper

Add Metal cogs and tiny tools to page as per photo

Add Chipboard Title


THANKS FOR DROPPING BY

HAVE A CRAFTY WEEK

MAUREEN


Moments


Morning all

This morning I will be spamming everyone as I have participated in a Cyber Crop last weekend

https://mysticalscrapbooks.com.au/

It started with a game of  Bingo, Oh my was it close the last call there was eight of us with  two left to go and one with one. I am sue on Sunday we where all waiting for those words to be called. Afraid it wasn't mine but we had a winner . I only got one of the words. It was fun thou.

The Crop was three sketches plus something added.

With Sketch Number one : was to use chipboard and Distressing inks plus sketch

A good way to ensure you use some , if your like me you could probably open your own chipboard store

I do hope you like my page

MY PAGE:


THE SKETCH:


PRODUCTS USED;

Kaisercraft "Le Belle"  Collection:- Paris Posy, Paris Posy Reverse Pin Stripe Reverse, Daisy,  Bird Cage Reverse, Sticker Sheet and Collectables 

Ranger Distress Inks:- Pine Needles, Aged Mahogany, Tea Dye and chipped Sapphire

Photo 3.75" x 4.25"

''Kinder Kreations' Word "Smile

 Corbet's  Creations Word "Love this "

 "Moments" unknown brand

CUTTING:

Cut "Pinstripe" 9.25" x 9.25"

Cut Daisy  12' X 4'

Cut "Bird Cage" 4" x 5.50"

Fussy Cut two flowers from "Posy


DISTRESS INKS:

Colour the Corbet's Word "Love this with Aged Mahogany,

Colour the chipboard words "Moments" using   Pine Needles, and chipped Sapphire

Colour ''Kinder Kreations' Word "Smile with Tea Dye 

Add Dimensional Magic to the words


ASSEMBLY:

Use "Paris Posy" as base

Add "Pinstripe" at an angle 0.50" from the left hand Side and 0.25"  from top 

Add "Daisy" 4" from the top

Add a word strip from the Sticker Sheet" from the top ( i did this to hide a join)

Add photo to Mat of "Bird Cage" Reverse

Add the fussy cut flowers and a few collectables to top left hand corner and bottom right hand corner of the photo

Add to page' from left hand side and 3.50" from the top

Add each piece to page as per photo


THANKS FOR LOOKING '

HAVE A CRAFTY DAY

MAUREEN

Adventure

Morning all

This is my second entry into the Mystical Scrapbooks Cyber weekend.

The challenge was to follow the sketch and use some gold

I went searching for some glitter card stock and found these pieces of corrugated cardstock. Did have to join them but pleased with the outcome

I hope you like my take on the sketch 


https://mysticalscrapbooks.com.au/

MY LAYOUT:


SKETCH:


PRODUCTS USED:

Unique Creative " Country Roads "Collections :- Iron and Steel Reverse, The Back Paddock Reverse, Be Awesome, The Real Deal, 

Uniquely Creative: "Rainforest Retreat " Retreat

Memory Maze Chipboard Fence

Ranger Inks:- Brushed Corduroy, Tea Dye,  and  Aged Mahogany 

Sullivan's Gold Corrugated Card 

Kaszazz Windmill stamp, Kangaroo and sheep

Dye Cut sheep from my stash 

Uniquely Creative Hessian

Photos 4" x 4.5" and  3.75 x 5"


CUTTING:

Cut "Back Paddock"  10.50" x 10.50"

Cut " Be Awesome" 9.50" x 9.50"

Cut  Photo mats from "The Real Deal" 4.25" x 4.75" and  4 ." x 5.25"

Cut Corrugated card 2 x 9.75" x 1" 

Cut "Retreat" 2 x 9.50" x 0.75"

Cut 2 x 2" x 0.50" of Hessian


STAMPING: 

Stamping to be completed once first three layers are complete

Using "Brushed  Corduroy" stamp tow sheep 2.50" from the left and 1.25" top

the second one 1" from the right and 0.25" from the top

Using " Aged Mahogany " stamp a windmill 5.25" from the right and 0.50" from the top

Using " Tea Dye" stamp a Kangaroo 2.50" from the right and 7.50" from the top

 Colour the Memory Maze chipboard using Distress Inks, wait till eachcolour dries before adding second layer


ASSEMBLY:

Use "Iron and Steel" Reverse as base

Add "The Back Paddock" Reverse, "leaving a 0.75" boarder

Add "Be Awesome" leaving a 1.25" border

Please do any stamping now

Add "Retreat" to "Gold" Corrugated Card

Add Hessian 1" from left hand side and 1.75" from the top

Add Second piece 2" from the left and 1.25" from the bottom

Add First Strip 2.025" from the top and 1" from left hand side

Add second Piece 9.50" from the top and  1" from the left

Add photo's to mats of  "Real Deal" 

Add landscape photo 2.50" from the right hand side and 3.25" from the top

Overlap Portrait photo 1" from the left and 5" from the top

Add fence 2" from the left and  0.75"" from the bottom

Add title as per photo


THANKS FOR DROPPING BY

HAVE A CRAFTY WEEK

MAUREEN


Thursday, 10 February 2022

PETS

 Afternoon all,

Another cool beautiful morning again with tops of 31 degrees Celsius (87 degrees Fahrenheit)

Its so lovely and quite today. I think everyone is driving around . I have been to see my spine specialistwho wants to run some  more tests before we work on next steps. The traffic into the city was a pain , so many stupid drivers on the road who seem to think that they needed to get to their destination quicker than any one else Arrived home without being hit by someone else

My I pad charger died this morning, so back to the lap top. I much prefer to use the I pad, need to find someone who sells them as I don't want to buy a new one.

This morning i completed a layout for Mystical Scrapbooks  as part of their monthly challenges

This month its all about sketches and  an added extra, which for this challenge is to use distress  inks 

 https://mysticalscrapbooks.com.au/

I am not a fan of using mixed media,  have used a floral stencil and some Ranger Distress Inks

I hope you like it


MY PAGE:


THE SKETCH


PRODUCTS USED:

Ranger Distress Inks :- Tea dye , Shabby Shutters, and Festive Berries

Uniquely Creative Water Coloured Card Stock

Cocoa Vanilla "These Days Collection:- Family Ties Reverse

Unknown Brand of Stencil

Kaiser Alcohol Marker No: 47

Unknown Brand of Alphas

2 Photos 3.25" x 3.50"

CUTTING:

Cut  "Family Ties Reverse" 12" x 4.25"

Stencil 2 rows of flowers using "Shabby Shutters" for the Leaves and  "Tea Dye" for the flowers onto the water coloured card stock. Starting at 2" in from  the left hand side and 1" from the top, with second one 6.50" from the top and 2" from left hand side. The second row started at 2.50" from the right hand side and 0.50" from the top, align second flower to first flower

Add stencil to  "Family Ties Reverse "using "Festive Berries" 6.50" from the top and  0.25" from left  of   "Family Ties Reverse


ASSEMBLY:

Use the stencil water coloured card stock , add "Family Ties Reverse"  3" from left hand side and hard against top.

Add the two photos overlapping one another Photo one" 1.25" from the top and 2.25" from the left hand side

Tuck second photo underneath first %" from the left hand side and 0.75" from the top

Add title to right hand side

Draw 2" circle with watercolour markers  and add journaling

Add Butterfly under photos


THANKS FOR STOPPING BY

HAVE A CRAFTY MONTH

MAUREEN 


Summer Love

Afternoon all,

I have sat an completed another layout with some very old holidaysnaps from the early 80s . We had been home for Christmas to see the parents and in-laws from N.S.W and on our way back to Western Australia,  we were towing a trailer packed filled with lots of shopping and our camping equipment.  We where going to spend the night just out of Mildura,  but instead didn't quite make it, the trailer snapped an axle. We had the trailer towed to somewhere that could fix it , but the part was not available so,we need to fine a home base for our unexpected stay. The Murray River caravan Park became our home base for 10days
Set up camp beside the river,  so peaceful in the evenings,  back then their was plenty of wild life.
We watched the River Streamer backwards and forwards on the river. And did a lot of sightseeing through the area. Interacted with the fruit pickers and the locals, it was a lovely place to be stranded. The kids loved it. They swam in the river,  we did lots of walksin the area.

The layout is for Mystical Scrapbooks. This month its all about Sketches,  plus and add extra. With this sketch it was to add chipboard and colour, paint or other form of medium to colour it
I have used inks plus Dimensional Magic on my two pieces

Back using up my scraps 
I hope you like the page 


MY PAGE:


THE SKETCH


PRODUCTS USED:

4 x 3.50" square photos
Kaisercraft "Beach Shack " Collection:- Foam Reverse and Wave  Break,  and Sticker Sheet 
Kaisercraft " Island Escape" Collection:- Bird of Paradise Reverse
Kaisercraft "Caribbean " Card Stock
Close to My Heart "Lemon Ink"
Kaisercraft "Blue Haze" Ink
Uniquely Creative Laser Cuts (Title) 
Memory Maze Laser Cuts Bird 
Memento Black Ink
Dimensional Magic 


CUTTING :

Cut " Foam" Reverse  4" X 12"
Cut " Bird of Paradise" 2 x 2.75" x 12" Tear one side of each piece 
Cut "Wave Break" 4 x 1.75 " x 12"  Tear one side of each piece 
Use Black "Memento " ink to cover Bird once dried at Dimensional Magic
Add "Blue Haze" ink to title once dry add a coating of "Lemon" 
One dried add Dimensional Magic "


ASSEMBLY:

Use "Caribbean" as the base
Add " Foam" Reverse  4" in from the left hand side and hard against top 
Add "Bird of Paradise" Reverse to left and right if page with torn edge facing inwards leve the torn edge free of tape or glue
Add pieces of  "Wave Break " tucking underneath previous papers until you reach "Foam" 
Complete on the right hand side  tucking under the straight edge
Add photos
First photo 0.25 " from the top and 4.50 " from left hand side 
Second photo overlap first photo 3.50 " from the top and 3.50 " from the left hand side 
Third photo overlap previous photo 6.25  " from the top and 4.25 " from the left hand side 
Fourth photo overlap previous photo  8.25" from the top and 2.25" from the left hand side
Add emblishment as per photo

THANKS FOR STOPPING BY 
HAVE A CRAFTY WEEK 
MAUREEN 


Wednesday, 11 August 2021

Capture the Smiles

 Morning all

Its a dull day, although not very cold. Rain is expected this afternoon. Hopefully it doesn't pass us by. 

Feeling really wash out today, we had our first COVID 19 shot on Monday, so hopefully  it is only that and that its not this infection I am still fighting. Had a blood test today so will know next doctors visit next week.

Today's post is for a sketch challenge over a Mystical Scrapbooks. They have two sketch ones this month

https://mysticalscrapbooks.blogspot.com/

Hopefully I feel well enough to complete the second sketch later in the month. I haven't participated in their challenges since March.

I hope you like how I interpreted the sketch 


MY LAYOUT:


THE SKETCH:


PRODUCTS USED:


Anko Purple Card Stock

Kaisercraft Wisteria Card Stock x 2

Uniquely Creative " Tranquillity " Collection:- Exquisite, Glorious, Graceful,  Blossom, Fabulous, Creative Cuts and Vellum Creative Cuts and Laser Cuts (title)

2 Crafty Border Chipboard 

Gesso

Kasazz Alcohol Markers, A382 and A579

MODGE podgy Dimensional Magic 

Photo 6" x 4"


CUTTING:

2: Cut "Wisteria card Stock 11.50" x 11.50"

3: Cut Uniquely Creative "Exquisite " 11" x 11"

4: Cut Uniquely Creative "Glorious " 2" x 12"

5: Cut "Wisteria " Card stock 2 x 1" x12:

6: Cut "Exquisite" 2 x 1" x 8"

7: coat the chipboard with "Gesso" then colour with A382 second coat with A579 then add coat of Modge Podge Dimensional Magic

8: Cut "Wisteria " card stock 7" x 5"

9: Uniquely Creative " Graceful " 6.5" x 4.5"

Fussy cut flowers from  "Blossom" and Butterflies  from "Fabulous"


ASSEMBLY:

Use "Purple" as Base 

Add 2 leaving a 0.25" border

Add 3 to 2 leaving  leaving a 0.25" border

Add 4 to 5 with a 0.25" border

Add 6 to 5 leaving a 0.75" border and 2" from the top

Repeating other side 

Add  chipboard border piece down centre of "Glorious "

Add to page 3.25" from the left and hard against top of page

Add 9 to 8 leaving a 0.25" border

Add photo leaving a 0.25" border

Add to page 2.75" from top and 2.75 from the top

Add Fussy cut pieces,Vellum Creative Cuts with the Creative Cuts  as per photo 

Add the Laser Cut title


THANKS FOR STOPPING BY 

HAVE A CRAFTY WEEK 

MAUREEN 


Tuesday, 13 July 2021

Happily ever After

 Morning all


Home from hospital after 89 day stay, this particular post has been sitting in my drafts since April

Just thought I would share . I want to say a big thank you to all thoes people who have been looking at my blog although I have not been  updating it.

It will take me a bit of time to recover, still dealing with a serious infection on my spinal cord. The medication makes me very sleepy so not up to much crafting at the moment.

I have made some Birthday cards which I will  share shortly, they where for an order for a lady. I had the order since just before I went to hospital.  Luckily she did not need them till late July so got them done just in case I needed to return to hospital. 

The criteria for this layout is : Use Black, white and one other colour


https://mysticalscrapbooks.blogspot.com/


MY LAYOUT:


PRODUCTS USED:

Kaisercraft: "Something Blue" Collection:-  Forever , I do and Sticker sheet 

2x Kaisercraft Coal  cardstock 

Sullivan's Heart Border Punch

Uniquely Creative lace flowers 

Green flowers from my stash


CUTTING:

Cut " Forever" 5" x 12"use Boarder Punch on 3 sides

Cut "I do" 11" x 11" and use border punch on all 4 sides

Cut black lace strip 1" x 11" from Sticker Sheet 

Cut Black heart Strip to 11" from the sticker sheet 


ASSEMBLY:

Add "I do" leaving an 0.50 "border all the away around the  "Coal" Cardstock 

Add "Forever"  2" from the left and 0.50 from the top

Add the strip of "Hearts " 3.75"from the left and 0.50 " from the top 

Add a section of green words 5" from the left 

Add row of Black Lace 6.50 " from the left

Add photo 4 .50"from the top and 4.25 " from the left 

Add cluster of flowers as per photo

Add a strip of words from Sticker Sheet below photo


THANKS FOR STOPPING BY 

HAVE A CRAFTY WEEK 

MAUREEN 


Sunday, 28 March 2021

Dance

Morning Guys

Thought I share the last of Mystical Scrapbooks Challenges for March.
The theme was FIRE AND WATER

https://mysticalscrapbooks.blogspot.com/

The third challenge for the month is a Mood Board.
I took my inspiration from the colours of the Zinnia, the background and butterflies. I was carried away with the floral and foliage stencil, not used them before.

I hope you like my take on the challenge.


MY PAGE;


THE MOODBOARD:


PRODUCTS USED:

Kaisercraft inks :- Forest and  Fern, 
Close to My Heart Lemon stamp ink
Tsukineko "Brilliance Sun Flower " ink 
Kaisercraft Stencils  :- Garden, Foliage and Roses
American Crafts "The Colour of Memories"
Kaisercraft Bow and Arrow :- Nature
Butterflies and flowers  from my Stash
6" x 4" portrait photo
Doodlebug Limeade Blossoms
Kaisercraft Rhinestones 
Kaisercraft Alpha's

CUTTING:
 
Cut " The Colour of Memories" 6.25" x  4.25"


ASSEMBLY:

Use "Nature" as your base  add the Garden Stencil  2" from the left hand side and 1.50 " from the bottom using Forest on leaves and stem and Sun Flower on flower head 
Add the Rose Stencil to top left hand corner  0.50" from the top  and 0.75" from the left 
Using Fern for leaves and Lemon for Flowers 
Add Foliage Stencil 2.5" from top and 0.75" from left hand side using Forest and Fern Ink
See photo for width
Add photo  to mat of " The Colour of Memories"
Add to page 0.75" from the right and 0.75" from the bottom 
Add Flowers, butterflies, brads , title and gems as per photo


THANKS FOR STOPPING BY 
HAVE A CRAFTY DAY 
MAUREEN 

Saturday, 27 March 2021

Baby Boy

 Hi guys,

Sorry to inundate you with my pages, just need to upload my cyber crop pages. This is the last one for Mystical Scrapbooks  Cyber Crop 

https://mysticalscrapbooks.blogspot.com/

The third challenge is to  Feature the Colour Blue with a Stencil.

I found this one quite easy, although Kaisercraft "Blue Haze" as turned out more of a yellow blue. Again I have used very little paper and concentrated on the stencils to give me the effect I wanted.

I hope you like it


MY LAYOUT:


 PRODUCTS USED:

Bo Bunny "Believe":- Joyous

Kaisercraft "Peek a Boo" :- Cherub,  Bambino and Collectables

Uniquely Creative stencils Floating Hearts and Doily Texture

Kaisercraft Blue Haze Ink

6" x 4" Photo


CUTTING:

Cut " Bambino" 6.50 " x 4.50 "

Fussy cut the "Baby in the Bath and Title from  "Cherub"


ASSEMBLY:

Using "Joyous" as base 

Add "Doily Texture" Stencil with Blue Haze" ink 2 " from the left and 2" from the top

Form a 7" x 8" square 

Add photo to "Bambino"

Add to page 3" from the left and 3" from the top   

Add Title add the Heart Stencil and "Blue Haze Ink" beside each section of title.

(See Photo) for further details

Add fussy cut pieces and Collectables 


THANKS FOR STOPPING BY 

HAVE A CRAFTY DAY 

MAUREEN 


Thankful

 Hi guys 


Just doing the second blog post for the Cyber crop for " Mystical Scrapbooks".  The cyber crop was last weekend and we have until the 28th March to have our pages in. 

The Theme is FIRE  AND WATER. 

https://mysticalscrapbooks.blogspot.com/

The second challenge is Fire and use either Red, Orange or Yellow plus a stencil on your page.

I have used Orange, Red, and  Yellow , Completing a very simple layout which I think is quite effective

I hope you like it


MY PAGE:


PRODUCTS USED  :

Kaisercraft "Circus " paper pad, 

Uniquely Creative Stencil and Word dye

Scraps of yellow card stock

Kaisercraft "Tangerine " ink

Photo 4" x 5.25 "Portrait 


CUTTING:

 Cut a  a 6.5" circle from the yellow star paper 

Fussy cut some Circus animals from the Fussy cut page

Dye cut title from yellow card stock 


ASSEMBLY:

Using the Tangerine Ink and the star Stencil Add all over the Starburst page

I went from the centre outwards

Add circle 2.5" from the top and 2.5" from left hand side

Add photo 3" from the top and 4" from left hand side

Add fussy cut pieces and dye cut title


THANKS FOR STOPPING BY 

HAVE A CRAFTY DAY

MAUREEN 

Blessed

Morning all

Its the weekend already, not sure where the week has gone , but disappeared once again.

The weather is getting a little cooler first thing in the morning, but beautiful 30 degrees Celsius days

I completed this one I think on Thursday but did not have enough time to complete do a blog post.

Its a part of Mystical Scrap Books Cyber crop last week end

https://mysticalscrapbooks.blogspot.com

The theme for the Crop is:- Fire and Water

Challenge No1: is sparkle and Texture. I have used modelling paste  to create my 4 corners and the Roses own the left hand side. I have used a Gold Sparkle brush over all the flowers, although it doesn't show up in the picture, but it definitely glistens. Also used some liquid pearls and pearlescent Wine Pearls to add Sparkle

I hope you like it 


MY LAYOUT:


PRODUCTS USED:

Kaisercraft "Flower Shoppe" Collection:- Weatherboard, Glass House, Afternoon Reverse and Collectables

Ranger Ink Liquid Pearlescent Pearls:-Ivy Green 

Monte Marte Modelling Paste

Colour Blast A6 Stencil :- Flower Cluster

Corner Stencil Freebie in Papercraft magazine

Uniquely Creative: Chunky lace Border Dye

Uniquely Creative word dye

Scraps of Royal Blue Card stock

Uniquely Creative Wine Pearls

Uniquely Creative  Gold and Clear Sparkle Brushes

Pink Flowers from my Stash


CUTTING:

Cut "Weatherboard" 5.75"  x 7.50 "

Cut salvage from " Afternoon Reverse"

Fussy cut butterflies from "Glass House"

Dye cut "Blessed" from scraps  Royal Blue card stock 

Dye cut 4" section of Chunky lace from "Afternoon Reverse"

Fussy cut 5.75"  from  top row of lace from "Weatherboard "


ASSEMBLY:

Use " Afternoon" Reverse as the base

Use corner Stencil and Modelling paste  on each of the 4 corners of the base 

Use Flower cluster stencil and Modelling Paste 4.5" from the top and 2.25 " from left hand side

Add the fussy cut lace bottom of "Weatherboard "

Add the dye cut Chunk lace to top of Photo

Add to  Weatherboard " 0.25" from the top and 1.25" from left

Add to page using foam tape 2" from the top and 4.25 " from left hand side 

Add the collectables, flowers, fussy cut butterflies and pearls to page as per photo

Add salvage from "Weatherboard " to bottom of "Afternoon Reverse "

Add title and liquid Pearls as per photo 

Use Sparkle Brush over the Stencilled flowers and cluster on the right hand side


THANKS FOR STOPPING BY 

HAVE A CRAFTY DAY 

MAUREEN 


Thursday, 18 March 2021

Our Adventure

 Morning all

A dry day but very cloudy , they did say we would have showers this afternoon. With rain for the coming week.

Been out early today,  when I came home thought I do Mystical Challenge, Challenge on is to create with torn paper and the colour blue. After cleaning up what was using yesterday I went through my papers for blue, did not want to do flowers  so went through the drawer which hold all the sea inspired papers.

https://mysticalscrapbooks.blogspot.com/

I thought  I would use the scraps in the "High Tide" bag, clean up some more scrap pieces.

The page i used as my background " Mast" Reverse already had a circle cut out though not in the middle, I worked around that.

Hope you like my layout.


MY LAYOUT:


PRODUCTS USED:

Kaisercraft "Arctic Blue , and Navy card stock.

Kaisercraft "High Tide" Collection:- Mast Reverse, Harbour, Sticker Sheet  and Collectables

Kaisercraft "Deep Sea " Collection:- Sea Shells Reverse , Deep Blue, Tide and Collectables 

Kaisercraft " Beach Shack" :- Board Walk

Blue Onion Bag from my stash


CUTTING

Each piece is to be torn all the way around

Tear "Mast " Reverse all sides except right hand side to create an 11.50" x 11" piece.

Cut 8.50" circle 2" from the top and 2.25" from left hand side, Tear around when cut

Cut "Harbour " 1.75" x 2"

Cut "Tide"3" x 6.75"

Tear a large fish from "Sea Shells reverse 

Cut "Deep Blue 8.50" x 1.75:

Cut "Boardwalk " 4" x 8.75"

Cut 6.25" x 4.25 " from Navy Cardstock 


ASSEMBLY  :

Starting at top of Circle add Boardwalk., Deep Blue tucking  it over  "Boardwalk".

Add " Tide" over the top of  "Deep Blue  "

Add Harbour  See photo for further details

Add torn fish to the right of "Deep Blue"

Add "Sea Shells" Reverse 

Add to "Arctic Blue" card stock

Add photo to mat of navy cardstock

Add the blue onion bag to back of photo with ragged bits sticking out

Add to page 3.50" from left hand side 3.50" from the top

Add Collectables as per photo


THANKS FOR STOPPING BY

HAVE A CRAFTY DAY

MAUREEN

Monday, 11 January 2021

A Boys Story is the Best that us ever told.

 Hello all

Today is day 2 of lockdown no new cases which is good,

This morning it was blue skies but a  bit cool, we have had wind all day which has kept the temperature down, so quite comfortable to scrap. 

I have joined in a 3 day virtual lockdown scrap retreat . Have not done as much today as my back did not like me sitting like I did yesterday so far have 4 layouts done, happy with that 4 challenges ticked off.

The first one is the Sketch Challenge for Mystical Scrapbooking 

https://mysticalscrapbooks.blogspot.com

Its the second challenge for the month. This month its all about Sketch's 

This is my Take on the sketch 


MY LAYOUT:


THE SKETCH:


PRODUCTS USED:

Kaisercraft "Technologic "Collection:-Download, Gigabyte, Pixels, Pixels Reverse and Barcode Reverse  and 6" paper pad.

Kaisercraft  "Peachy Keen" :- Super  and Super Reverse

Kaisercraft  " Fun Fair":- Sideshow Reverse

Kaisercraft " Circus" 48 page paper pad

Uniquely Creative Essential Dyes

4" square Photo


CUTTING:

Cut Salvage from  "Download"

Cut three rows of "Chevron  Strips" from " Circus" paper

Cut "Super"  7" x 6"

Cut "Super" Reverse 6.25" x 3"

Cut "Gigabyte" 6" x 5"

Cut " Pixels " Reverse 4.5" x 4.5"

Cut "Barcode" Reverse 4" x 1"

Cut "Pixels"  2" x 6.50"

Cut "Side Show" Reverse 1.25" x 7.50" and .50"× 1.25"

Dye cut 2 x  1" circle and 2 x 1.5" circles from scraps


ASSEMBLY:

Add Salvage from "Download" to base of "Download "

Add the "Chevron " stripes to top of page using foam tape

Add "Super" To "Download" 3.25 from top and hard against left hand side

Add" Super" Reverse  5.75"  from the top and hard against left hand side 

Add "Gigabyte" 2.75" from the top and hard against left hand side 

Add photo to "Pixels" Reverse leaving a 0.25" gap all around

Add to page  3.25 from the top  and 0.25" from the left hand side 

Add strip from 6" paper pad underneath  "Super "

Add "Pixels" 2.50" from the top and hard against right hand side 

Add "Side Show" Reverse 2: from the top and hard against right-hand side 

Add " Barcode" Reverse 3.25" from the top and 0.50 from right hand side 

Add title from the paper pad

Add circles  As per photo


THANKS FOR STOPPING BY 

HAVE A GREAT CRAFTY WEEK 

STAY SAFE 

MAUREEN

Tuesday, 5 January 2021

Simple Moments make Great Memories


Morning 

Blue skies this morning, it's going to be a lovely fine day , tops of 32 degree's a bit warm.

This morning I thought I would take down some china bits and pieces and give them a bath and clean the shelf. Finished two shelves so a start ( standing like that gives me pins and needles. So lit bits at a time have 7 shelves I want to do.

Today's layout is Challenge No: 2 for Mystical Scrapbooking . This month they have 2 Sketches and a cyber crop on the 15th.

https://mysticalscrapbooks.blogspot.com

I am again using paper from a  couple of different collections. 

I hope you like my interpretation


THE LAYOUT:


THE SKETCH :


PRODUCTS USED:

Kaisercraft "Hibiscus" Cardstock

2 Crafty Chipboard

Uniquely Creative: "Gums and Roses" Collection:- Bouquet Reverse, Eucalypt Posy and Creative Cuts

Uniquely Creative" Wise and Free  " Collection :- Fearless, Potential and Creative Cuts

Pearls and cheese cloth  from my Stash

2 x 2"x 5.25" photo's and 1x 2.50" x 5.25"


CUTTING:

Cut a 7" square from the middle of "Hibiscus" Card Stock

Cut "Bouquet" Reverse to 11" square

Cut 9" Circle  from " Eucalypts Posey"

Fussy cut flowers and feathers from "Fearless" and "Potential"


ASSEMBLY:

Add "Bouquet " Reverse to "Hibiscus" Cardstock 

Add 9" circle, 1.25" from left hand side and 1.50 from top

Add photos to mat leaving 0.25" gap between photos  and larger one in the middle

Add title 6.25" from left and 9" from the top

Add floral Cluster  with some cheesecloth and Creative Cuts to top and bottom left hand side of the first photo

Add remaining embellishments as per photo


THANKS FOR STOPPING BY 

KEEP SAFE

MAUREEN 


Monday, 28 December 2020

Cousins

 Morning all


The sun is streaming through the window   it was quite mild yesterday mid 20s with low humidity,  but today is expected to hit 32 degrees and high humidity.  I suppose it is Summer here in Australia.

I am sharing the second layout for Mystical Scrapbooks monthly challenge which I did yesterday.

https://mysticalscrapbooks.blogspot.com

This month's second challenge was to use Splatters. I usually muck them up and the layout looks terrible, so decided to mark out where I want my photo and mats, then I splatter before I  put anything down it work well enough that I am pleased with the end result, but had to change it up a bit as I wanted  to use a landscape  photo. But could not find it so turned it around and added a portrait photo

I hope you like what I have  done.


MY LAYOUT:


PRODUCTS USED:


Kaisercraft "Lavender Haze" Collection:- Lilac, Perfume,  Perfume Reverse,  Violet Reverse, Wisteria, Wisteria Reverse and Sticker Sheet. 

Unknown brand of a Bottle of Purple Mist

Flower Dye Cuts from a swap 

Kaisercraft:- Rhinestones, Black Pearl's and Wooden Flourishes 

Uniquely Creative:- Enamel Dots and Wooden  Stars

Photo 4" x 5"


CUTTING:

Cut 0.25" from top of "Lilac

Cut "Perfume " 4.50" x 6.25 and 6.25"× 4.50"

Cut  "Violet" Reverse 9.50" x 4"

Cut "Wisteria " 5.50" x 1"

Cut "Wisteria " Reverse 5" × 1.50"


ASSEMBLY:


Use "Lilac" as the Base, Paint Splatter using  Purple mist

With the salvage edge on the right-hand side add the piece of "Violet " Reverse to Lilac. 1.25" from top and 4" from left hand side

Add the piece of "Perfume" with stripes running vertical 4.50" from the left hand side and 3" from the top

Add the second piece of "Perfume" with stripes ruining horizontal 5" from the left hand side and 2.50" from the top 

Add "Wisteria " Reverse 2.75 from the left hand side and 3.50 from the top 

Add "Wisteria " 1.50" from the left hand side and 3.50" from the top 

Add the pink strip of flowers from the Sticker  Sheet  7" from left hand side at  bottom of page 

Add the pink strip of flowers from the Sticker Sheet 4.25" from the left at top of page

Add the multi coloured strip of flowers from the Stickers Sheet 6" from the top on left hand side and 7.50" from Right hand side 

Add Dragon flies  and swirls as per photo From the Sticker Sheet 

Make flowers from Dye Cuts and Stickers at top and bottom of photo 

Add Wooden flourishes as per photo 

Add Pearls  and Enamel dots as per photo 


HAPPY & SAFE NEW YEAR

THANKS FOR STOPPING BY

MAUREEN