Hello Everyone,
A bit drier here is the south east we had a few sun showers today and that's about all, still very wet under foot. Was up early and succeed to get my chores done before the builders started this morning, i think they thought it was going to rain.
This morning I completed a layout , a simple sketch one, will blog it later. With the layout I wanted to use my scraps of Kaisercraft "Chase the Rainbows", when i had finished a had a few bits left over, as well as a couple of pages in the 6.5"paper pad, only need one sheet from there.
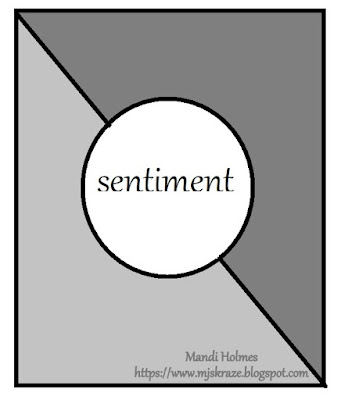
I saw this challenge early in the month when i entered the single page layout, into the "Stick it Down" blog spot challenge. (there is a double page as well). The card sketch was brilliant for my left overs. Made two using the sketch , plus two more. Now no 12" x 12" paper left. pr sticker sheet. no collectables either
THE SKETCH:

MY INTERPRETATION:
PRODUCTS USED:
Kaisercraft "Chase the Rainbow" Collection:- Tint Reverse, Tone, Gloss sheet of Butterflies from 6.5" paper pad, Sticker Sheet
Paper Roses Australian Rectangle stitched Dye
Kaisercraft stitched circle Dye
Cream card bases from my stash
DYE CUTTING:
Dye cut using the largest of the dyes 1 x butterflies gloss sheet , "Tint Reverse" and "Tone"
Dye Cut using stitched 6.5 cm circle dye from "Tone" and "Tint" reverse
Dye cut using stitched 4.5 cm circle dye from "Tint Reverse" and "Tone"
Cut your largest rectangles in half (corner to Corner)
This will give you three card bases (I have only used two)
ASSEMBLY:
Using your to cut large rectangles add the "Butterflies" to top right of one and bottom left on the other base , then in the opposite corner add "Tint" reverse and "Tone"to each of your card base leaving an eight of an inch boarder.
At the join point used a thin strip of orange and one of green from the sticker sheet.
Using foam date start with the graduating circles (see photo ) for further details of what i have used on each add these to the rectangles on each card base.
Add butterflies from the sticker sheet and circle sentiment to each of the cards.
Added a few gems to butterflies
YOU NOW HAVE TWO CARDS:
These cards are quick and simple and can be made from any coordinating pattern paper
I actually made four cards from my left overs and used some of the bits from the paper pad for sentiments in just under and hour with interruptions.
Photo below:


Cute cards. Thanks for joining us at Stick it Down.
ReplyDeleteColleen--DT for SID
http://scrappingranny-colleen.blogspot.com/
Wow Great cards they are perfect love the patterns on go really well good on you. Megan
ReplyDeleteYour colors are lovely! How wonderful that you made two cards to play along! Wonderful butterfly and coordinating papers. Thank you for joining us at Stick it Down---Sharon DT
ReplyDeleteLove the boldness of these card. Thanks for playing along at Stick It Down. - Mandi
ReplyDeleteAwesome!
ReplyDeletexx
Diana
Click here for my DIY blog with free SVG cut files and 3Dprint files and much more...
Great card. What a fab interpretation of the sketch. Thanks for joining us over on Stick It Down.
ReplyDeleteTerri xxx (SID DT)
Very cute cards! Thanks for joining us at Stick it Down
ReplyDeleteMonica- DT